Monday, December 29, 2008

They’re Not All the Same


The following is a list of the most common electrical boxes:
  • Rectangular for switches and receptacles
  • Square for junctions or two receptacles/ switches
  • Octagonal and round for ceiling fixtures
  • Retrofit types for inserting into existing walls and ceilings
  • Aluminum and PVC plastic for exterior use
  • Boxes with extendible bars or braces for attaching between joist
  • Pancake boxes for limited circumstances when a regular box is too deep for the wall or ceiling space (Most of the plastic ones are not listed as tested by UL, and the metal ones are rated for only one cable, usually 14 gauge.)
  • Fan-rated boxes—the only boxes you can use to install paddle fans

Don’t Forget the Boxes


The NEC code requires that any wires connected to each other or attached to a fixture or device must be enclosed in a box with a cover plate. This means that receptacles, switches, lights, wall heaters, anything that requires electricity will have its wiring housed in a box. A box serves a number of purposes:
  • It serves as a point of attachment for a device or a fixture. (It has to be screwed to something.)
  • It keeps wires that could short and then spark away from wood framing, decreasing the possibility of fire.
  • It protects people from accidental exposure to wires and possible shock.
There are boxes for every purpose: ceiling lights, retrofitting fixtures into existing walls, weatherproof designs for outdoor use, and junctions for wire connections that aren’t immediately attached to a device or fixture. As with switches and receptacles, you’ll have to choose the right box for the job at hand.

Receptacles Galore


Most of the receptacles in your home are the duplex type and have been in common use for the better part of the century. Current versions differ from those used through the 1950s because the newer ones have a grounding hole. Polarized receptacles came into use in the 1920s. The different-size slots (the longer one always goes with the neutral wire, the shorter with the hot) maintain consistent, directed current flow along the respective hot and neutral wires. The earliest receptacles were an odd arrangement. The plug-in part of the outlet was actually a screw-in affair, something like a light bulb. The receptacle plate had a small flap that flipped up to reveal a socket into which the plug-in was screwed. (Hey, electrification had to start somewhere.)
The following are specialized types of duplex receptacles:
  • Floor receptacles
  • Clock receptacles
  • GFCIs
Floor receptacles are specially designed to withstand foot traffic. They are installed in the middle of large rooms or in other areas far away from a wall receptacle. They often are seen in offices and other commercial settings with large, undivided floor spaces.
A clock receptacle is recessed so that a clock and its cord can be hung flush against a wall. You used to see these more often in kitchens, but you don’t see them as often now, especially since the advent of inexpensive battery-powered wall clocks. This type of receptacle is now more common for plugging in microwaves and for picture lights that plug in behind pictures and paintings.
A GFCI can be used for a single location such as a bathroom or a kitchen, or it can offer protection to an entire circuit of receptacles or other loads. This is possible only if the GFCI is the first receptacle on a circuit. From that point on, anything beyond it on the same circuit will have GFCI protection. If it’s in the middle of a circuit or in any other position than the first receptacle, it will not offer any protection to any load between it and the service panel.

Timers and Doorbells


Timers, either manual or automatic, also are types of switches. Manual timers regularly are used with bathroom fans and heat lamps. A frequent residential use of automatic timers is to control a whole-house ventilation system. Doorbells are switches, too. When you press the button, a low-voltage current flows to the chimes or the buzzer. Thermostats are another low-voltage switch, except these are activated by temperature changes. Elaborate thermostats have separate switches for controlling the furnace fan and for turning heat and air conditioning on and off manually.

Dimmers


In addition to their romantic value, dimmer switches enable you to decrease the lighting in the dining room so your kids can’t see that you’re feeding them Brussels sprouts, a side dish that no human being should ever eat anyway. Dimmer switches come in several styles including those with …
  • A toggle control.
  • A dial control.
  • A sliding control.
  • Automatic dimming.
A dimmer reduces the voltage reaching a light fixture, but in doing so, the switch builds up a small amount of heat. Because of this heat and the large size of a dimmer switch compared to other switches, it might not work as a replacement for an existing switch if you have an undersized or crowded box.

Saturday, December 13, 2008

Pilot-Light Switch


A pilot-light switch resembles a standard singlepole switch, except it has a built-in bulb (either the toggle is illuminated or the bulb is on the face of the switch) that lights up when the switch is in the “On” position. This usually is installed when the fixture or light is out of sight of the switch (say, a light in a detached garage). The illuminated switch lets you know if someone forgot to turn the lights off.

Ganging Up


Switches for multiple light fixtures often are ganged up in one box. If all the lights are on the same circuit, one feed wire from the panel will supply the power for all the switches and their loads. A separate cable will run to each fixture. Sometimes you’ll run across a single gang box with a double switch, but this isn’t very common in residential systems.
How many switches can you fit in one box? Leviton offers one switch plate that has space for 10 switches. You’ll find these in commercial settings or maybe in an Internet gazzillionaire’s new mansion.

Switch/Receptacle Combo


This handy device is half receptacle and half switch. It’s a quick way to add a receptacle to a room (after you’ve calculated the amperage of the new load—remember not to overload your circuits). The receptacle will be at switch height, which typically is four feet from the floor to the top of the receptacle box. The switch and the receptacle can operate independently of each other, or the receptacle can be controlled by the switch, perhaps for a hanging ceiling lamp not directly wired to a circuit that came with a lamp cord and plug.

Four-Way Switch


This one is always found between a pair of three-way switches. You’d have to have a really long hallway or a large room needing switch controls from three locations. A four-way switch comes with two pairs of color-matched terminal screws that conveniently connect with color-matched wires from the two three-way switches.

Three-Way Switch


Three-way switches come in twos so you can control a light from two locations. Their most common location is at the top and bottom of a staircase or at opposite ends of a large room with more than one entrance. Three-way switches come with three terminal screws: Two are the traveler screw terminals; the third, which is darker in color, is the common screw terminal. The traveler terminals connect one switch to the other. The cable that runs between the switches has two hot wires: one neutral, and one ground.

Saturday, November 29, 2008

Electrical Switches


The most common switch in your house is a single-pole switch with a toggle marked “On” and “Off.” It typically is used to control a light fixture or a receptacle. Single-pole simply refers to electricity flowing in one direction. In most cases, one black (hot) wire is connected to one terminal screw (or it might be back wired), and a second hot wire is connected to the other terminal screw, proceeding on to the light. In terms of physics, a pole is just one of two opposite points on a magnet that manifest the magnetic properties. (Remember, a spinning magnet, called a dynamo, at your utility’s power plant creates the electric current.) Unlike older switches, modern versions often come with a ground terminal for the green or bare copper ground wire.
A single-pole switch controls the current to its load from one location only. Other witches control the current from two or even three different locations

There’s One for Every Purpose


The world of electrical devices is quite varied. The light switch in your bedroom isn’t quite the same as those at the top and bottom of your staircase. The latter most likely are three-way switches (possibly four-way), which control an electrical load (in this case, the light) from more than one location. You might have an emergency switch that controls your oil furnace or a timer switch connected to a bathroom fan. You need to know one from another when you go to replace an existing switch or install a new one.
Receptacles are no different. You’re already familiar with a standard duplex outlet (your house is full of them) and a GFCI receptacle. There also are single receptacles that take one plug, receptacles for clothes dryers and electric ranges that carry both 120 and 240 volts, and special hospital-grade receptacles. Older homes might have original unpolarized receptacles or even some old twist-lock-style receptacles. You have to know what you’re dealing with before you replace it; otherwise, you could create a hazardous situation.
As always, follow the unwritten rule of electrical work: Buy only UL-approved materials. The world of Internet trading and crashing trade barriers means more nonlisted devices than ever will be available, but stick with the tried and true, even if your code allows the others. You want some assurances that you’re buying a safe product.

Switches and Receptacles

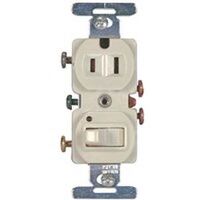
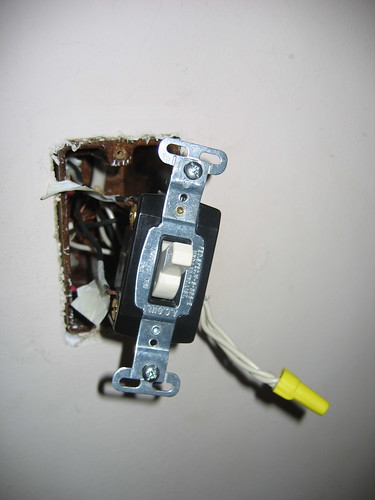
We use them every day, but we don’t think about them much. This is a good indication of the reliability of switches and receptacles. A bathroom light switch, for example, might be clicked on and off 10 times a day (depending on the size of your family). That’s a few thousand clicks each year, and the switch keeps going and going. If only our computers and operating systems were that reliable. A switch controls the flow of electricity between a source and an end device such as a light fixture. In a standard modern light switch, a metal arm inside the switch connects the two screw terminals to which the black, or hot, wires are connected. In the “Off” position, this arm moves out of the way and cuts off the flow of electricity along the conductors.
Receptacles don’t face as much mechanical wear and tear as a switch undergoes. A common house receptacle is called a duplex receptacle because it can accommodate two plugs. The metal connector between the screw terminals is fixed in place, unlike the movable arm in a switch. Each prong of a plug is held in place by two pieces of spring metal to maintain a solid electrical contact.
Both switches and receptacles can wear out, especially the original ones in an old home.

Cleanup and Wall-Repair Woes


In an existing house, any extensive rewiring will require opening up some walls and ceilings by cutting into the drywall or plaster. Electricians have two conflicting issues here: One voice—yours—says keep the holes small; the other voice—the electrician’s—says a larger hole makes the job easier and faster. Guess which one wins out? I’m not against electricians, and no, it doesn’t mean they’re going to knock a three-foot-bythree-foot hole in your wall just to pull one wire through it. It does mean, however, that you’ll have some wall and ceiling repairs to do after the electrician is finished. Drywall and plaster repair costs need to be figured into your electrical budget unless you do the work yourself. It doesn’t stop there, however. Your electrician might have to drill through paneling or wallpaper whose patching is a little more problematic. If a room hasn’t been painted in many years, the paint will have faded and won’t necessarily match up very well with the can of Colonial blue latex sitting in the garage. Figure this into your planning costs so it’s not such a surprise later.

A Deal’s a Deal


After you’ve agreed to the job and have signed on the dotted line, you have to hold up your end of things, too. This means … Clearing furniture and household items out of the way so your electrician can work.
  • Keeping your children at a safe distance from the work activity.
  • Controlling your pets.
  • Providing access to your house, either with a key or by being home at the start of the workday.
  • Understanding that your contractor and any crew will need access to a bathroom and somewhere to take their breaks.
  • Paying your bill in a timely manner. Small contractors are especially dependent on regular cash flow, and you shouldn’t unnecessarily delay payment.
Being a good customer is just as important as being a good contractor—all good contractors have stories about customers from hell.

Wednesday, November 12, 2008

What is a Change Orders?

A change order is a modification to a contract. It can be initiated by either you or your contractor, but it must be agreed to by both. You might decide to add more lights, for example, or a different type of fixture. Your electrician might run across unforeseen problems such as an existing circuit that must be replaced (when you assumed it could still be used). A change order usually means an increase in the price of the job, but this is not always the case. You might decide to eliminate some fixtures or to go for less-expensive ones, thus lowering your overall cost. The best change order, ideally, is no change order. Change orders can delay a job and might cause your electrician to have to undo work completed under your original specifications to accommodate the requested change. No plan is perfect. Remodeling is a fluid experience. As it progresses, you might see things you did not see during the planning stages. A skylight in the bedroom might become more desirable than the track lighting that just went in this morning. Don’t laugh, I had a client with more money than sense who did just that. Out came the new drywall and lights; in went new skylights and windows into newly finished rooms. At least he kept the carpenters employed and happy.

About Those Electrical Contracts


Some contractors—and homeowners—want a written contract for everything. This is unnecessary for small jobs, but there’s no harm in writing up a short letter of intent. You could say, for example, “Contractor will supply all labor and materials for one new bathroom circuit with GFCI receptacle for the sum of ______ dollars plus applicable tax. Homeowner will take care of any wall repair or patching.” For that matter, your contractor might supply a contract form for small jobs with a written description of the work and ask for your signature to confirm your acceptance. Larger jobs usually require a written contract. If your electrician is hesitant to provide one or to sign yours, find someone else to do the work. No legitimate contractor will shy away from a valid contract.
A contract should include everything you want done. Don’t assume that your electrician can read your mind and will install cream-colored receptacles when white is more common. If you have any questions, ask before you sign.

Comparing Bids


A clear set of plans and specifications enables all the bidding electricians to play by the same set of ground rules. It also helps you fairly compare their prices. You’ll find, as you put a job out to bid, that each electrician has a slightly different take on how to do the work and what materials to use. Keep these suggestions in mind as you scrutinize the bids so you can adjust for specific differences in cost. Let’s say you want a standard, switch-controlled light to be installed outside your garage. One of your bidders might suggest that you put in a motion detector instead, which will automatically turn on the light when it detects someone moving nearby. Another bidder might suggest that you install a larger ventilation fan in your kitchen. The service panel is the big item. If you specify one brand and an electrician recommends another, find out why and compare the differences in cost by calling an electrical wholesaler.

Allowing Substitutions


As remodeling bids come in and budgets get stretched, your imported marble countertop might suddenly become plastic laminate and your oak floor might become vinyl. The same is true with electrical work. Lights, appliances, and garage-door openers are available in a range of models and prices. Sometimes your electrician can come up with an equivalent-model fixture at a lower price with no appreciable difference in quality or appearance. Your bids and specifications should allow for such substitutions.

Who Draws the Electrical Instalation Plan?


You, your designer, or your electrician will draw up or sketch any plans for the electrical work. Written descriptions (“locate panel in NE corner of basement”) usually are adequate for most residential jobs. Specific light locations, however, should be noted on a sketch or plan of the room. It’s not a bad idea to put some kind of marker on the wall, such as blue masking tape, to confirm the location. An architect’s or designer’s plans for a general remodel should note any electrical requirements.

Tuesday, October 28, 2008

Prepare Your Electrical Work Plans and Specifications—Always!

You can’t expect someone to bid on a job if you don’t specify exactly what you want done. It’s not enough to say, “Just add some receptacles and lights wherever you think we need them.” You have to specify where you want them, the types of fixtures you want, and even the styles of light bulbs. You don’t need detailed plans and specifications for everything. Adding a clothes-dryer circuit, for example, is pretty straightforward once you’ve designated where the laundry will be located. Details increase as the scope of the job increases. Installing a new service panel might mean a different location than an existing box. (This obviously is true when an old fuse box located off a back porch is replaced.) A complete update of your existing system, including running all new wire, would have to be detailed, especially when it comes to fixtures and their locations. The following list outlines a very basic plan:

Sample House Plan

Main service: 200-amp Square D QO service panel

Location: NE corner of basement Existing fuse box will serve as a junction box for any existing circuits to be retained. The door will be screwed shut. New circuits to be added: Washing machine, dryer

Kitchen: Add two 20-amp small-appliance circuits with GFCIs, white Leviton receptacles, and cover plates. Install nine recessed cans (white trim) with dimmer switch (white) and two 18-inch fluorescent fixtures over counters. Run outlet for range and separate circuits for microwave, refrigerator, and disposer.

Lighting: Add sufficient 15-amp circuits to bring bedrooms, living and dining room, and hallway up to code for receptacles (six-foot rule).

Office: Run dedicated 15-amp computer circuit.

Master bathroom: Run GFCI. Install six-light fixture over mirror and recessed can over toilet (white trim). Install Nutone QT-200 fan.

First-floor bath: Run GFCI. Install four-light fixture over mirror. Install Nutone QT-100 fan.

Living room: Install four wall sconces and one recessed can over fireplace.

Dining: Use existing chandelier. Check wiring for safety.

Bedroom hallway: Use existing fixture and check wiring. Use existing bedroom ceiling lights and check wiring.

Basement: Run 20-amp circuit for workshop. Install four-foot fluorescent fixtures. Install six ceramic light fixtures in basement ceiling, locations to be marked.

Garage: Run GFCI and one light over each car bay. Run wiring for two garagedoor openers (to be installed by others).

Front porch: Install new porch light (Nautilus style). Install GFCI for outdoor use.

Rear porch: Use existing light and check wiring. Install GFCI for outdoor use. Contractor will supply all labor and materials and will remove any refuse from job site. Job will be kept broom-clean daily. Billing will be done in two installments with a 10-percent down payment to be applied toward materials.

Insurance Is a Must


This is the bottom line: You want your contractor to be fully insured. Proof of insurance usually is a requirement for a contractor to obtain a license. Insurance protects you if there’s an accident or damage during the course of the work. In addition to a general liability policy, contractors must cover their employees with government-mandated policies such as workers’ compensation.

The need for contractor’s bond (surety bond)


A contractor’s bond (surety bond) is required in many states before a contractor will be issued a license to operate. The bond helps guarantee that a contractor will perform according to the terms of a contract. I suppose it’s not much different in principle from a jail bond, which is an attempt to guarantee a defendant’s appearance in court, but with a more wholesome connotation.
A bond is registered with a governing authority in one of two ways:
  • The contractor can establish a special account with a cash deposit equivalent to the amount of the bond.
  • A bonding company can be engaged for a fee. The amount of the bond varies from state to state. In Washington, for example, the bonding rates are relatively low. A general contractor only has to post a $6,000 bond, and a specialty contractor or subcontractor (electricians, plumbers, painters, and so on) must post only a $4,000 bond. If you are not satisfied with a contractor’s work, you can put in a claim against the bond, although you’re limited to its dollar amount. This isn’t much consolation if all you can collect is a fraction of the value of the work, and you must pursue additional financial relief through the courts or arbitration.
Any claim against a contractor must be legitimate. You have to prove that the work was not done to the specifications agreed to in your contract. Just as a bond gives you some leverage in the event of faulty work, a lien (sounds like “lean,” appropriately enough) gives a contractor some protection against a customer’s spurious claims. Sometimes called a mechanic’s lien, this handy piece of legal work enables a contractor to file a claim against your home until your debt is paid. This doesn’t mean your contractor is going to take up residence in your spare bedroom if you don’t pay, but the lien must be satisfied before the property can be sold. In some cases, a forced sale of the property can occur.

Electrical License and Bonding


Unless you live buried away in the extreme northeast corner of Montana in an area so remote that no one, not even the IRS or junk mailers, knows it exists, you should expect an electrician to be licensed, bonded, and insured in accordance with local and state laws. These requirements are fairly standard across the country. They protect you and the contractor from each other if problems arise. A license is simply permission from a governing authority to do a specific business. It shows that a contractor is registered, often with both the city and the state, and has met certain standards. This enables a contractor to hang a shingle out and say, “I’m an electrician.” It also means the local government has collected a registration fee and will be collecting taxes from the licensee.
Two requirements usually have to be met before a contractor’s license is issued:
  • The individual must be bonded.
  • The business must be insured.

Contracting for Electrical Contractor


If you skim the Yellow Pages, you’ll find lots of listings for electrical contractors, but that’s not the best way to choose one for your job. You probably didn’t find your physician, dentist, or auto mechanic this way, so why choose an electrician blindly? Do what you did with all the other professionals in your life—get some referrals.
Start with other homeowners. They will be your most obvious resource, particularly if they’ve done any remodeling. Ask your friends, family, co-workers, even your dentist! There is no guarantee that a contractor will give you the same results in your home, but there’s a good chance you’ll be satisfied with the results of a referral. Most small contractors survive on referrals and will want yours as well.
A contractor’s time is valuable, so don’t call a dozen of them to give you a price for adding one circuit to your house. A larger job (such as a service change or a total rewire) is another matter, and three or four bids would not be inappropriate. First, however, there are a few legalities to consider.

Choosing a good electrician

Few homeowners do all the necessary electrical work on an old house. Upgrading a service, tying into old circuits, and rewiring existing ceiling lights can be intimidating tasks. Even if you choose to do more limited electrical work and hire the rest out, a good working knowledge of electricity and your home’s electrical system will enable you to discuss the job intelligently with your electrician and to compare bids more critically.
When you hire a contractor, you each have your respective responsibilities and expectations. You need to clearly communicate what you want done and the time frame in which it must be completed. The contractor must be equally clear in stating the work as he or she understands it from your plans, the cost for labor and materials, and a reasonable completion date. Any changes by either party must be negotiated.
This might be a new experience for you. You’ll find this stranger and perhaps a crew of one or two people wandering around your house in work boots, punching holes in the walls, and shutting your power off from time to time. Who are these people and how do you deal with them? Suddenly you’re an employer of sorts, hoping these new employees are going to work out before you write them a check. You and your contractor should have the same goal: an efficient job done as agreed to in advance with a minimum of disruption. Don’t worry, clear communications with a carefully selected electrician—and maybe a box of doughnuts in the morning—will smooth the way for everyone involved.

More on Surge Suppressor


A couple other tech toys you might not have known you desperately needed are line conditioners and an uninterrupted power supply (UPS). A line conditioner adjusts the line voltage to a norm, getting rid of highs and lows. This is a good piece of equipment to have if your home electrical system has a regular case of the sags. A UPS is basically a sophisticated battery pack with various filtering properties that kick in when you have a power outage. The key word here is “battery.” You don’t want to be running your laser printer or copying machine off of this if you lose power. Use it for your computer, not the peripherals.
Surge suppressors come with a few guidelines as well, just like extension cords. These guidelines include …
  • Don’t go beyond the electrical rating of the suppressor.
  • Surge suppressors are designed for indoor use in dry areas.
  • Don’t plug the suppressor into an extension cord.
  • Keep children and pets away from the suppressor’s power cord.
  • Suppressors are not designed to be used with aquariums.
Some available systems offer protection starting at your home’s meter. A suppressor is installed near the electric meter, and it protects major appliances from surges and lightning strikes. Standard plug-in suppressors are installed inside your home for more sensitive equipment. The Square D company manufactures an inexpensive surge suppressor that mounts directly in the service panel like a two-pole breaker.

Wednesday, October 15, 2008

Some considerations before you purchase surge suppressors

If you must wade, here are some considerations before you purchase:
  • The suppressor should have at least a UL 1449-330-volt let-through rating (the lowest amount of voltage the suppressor allows to pass through). This is basically a safety rating. A higher rating, UL Adjunct Endurance Testing, meets tougher government Commercial Item Description (CID) Class, Grade, and Mode specifications.
  • Telephone line, fax line, and coaxial cable line protection should be provided. ➤ It should have a high joule rating. (This measures your suppressor’s capability to absorb energy, which is measured in joules.)
  • It should have high surge amp ratings.
  • The suppressor should have an indicator light to show that the device is working.
  • It should provide protection in all three modes (surges between hot, neutral, and ground lines).
  • It should have instantaneous response time.
  • The unit should shut off power to all of its outlets once the unit has reached its capacity to protect.
  • It should offer a broad degree of EMI/RFI noise reduction. Competing claims among surge-suppressor manufacturers start sounding like taunts between opposing cliques in the schoolyard.
It begins to sound like the Macintosh versus PC battle. My advice? I’d still buy the suppressor with the best guarantee for my price range. Any damage to your equipment or data then becomes the manufacturer’s problem. (Read the guarantee carefully.)

Warranty for Surge Suppressors

If you search the Web for surge suppressors or go into a computer store, you’ll be surprised at how many manufacturers have the absolutely best product available. They can’t even agree on the best criteria to judge suppressors. What’s a consumer to do? Simple: Pick the suppressor with the best warranty. Such a warranty will guarantee the following:
  • Repair or replacement of the suppressor and any connected equipment for life if the suppressor fails to protect against surges
  • Payment for the retrieval of lost data
  • A high maximum dollar amount for damages This kind of guarantee doesn’t come as cheaply as a less-inclusive one, but it does make choosing a suppressor a lot easier than wading through the claims and manufacturers’ specifications.

Computers Aren’t Very Tough


We can replace a television or an answering machine quite easily, but it’s not so easy to retrieve lost data on a hard drive after a surge or spike hits the old PC. The worst-case scenarios, at least as presented by various surge-suppressor manufacturers, include …
  • Losing any data in memory.
  • Possible damage to the file allocation table because the computer would not have been shut down properly.
  • The stress of regular, unnoticed surges gradually deteriorating your computer’s components.
  • Sags causing a system crash and the possible loss of data.
  • A strong spike frying your PC.
If you live in an area of frequent storms or windy weather that might cause your power to go out, a surge suppressor should be higher up on your birthday wish list than if storms are infrequent. Nevertheless, given our creeping dependence on computers and stored data, a surge suppressor is a good idea wherever you are. (Sorting through all the competing claims by different manufacturers is another issue altogether.)

Sunday, September 21, 2008

What Do Surge Suppressor Do?

In addition to making surge-suppressor salespeople happy when they sell them, a surge suppressor protects all the electronic equipment we seem to have around our homes these days, from computers to VCRs. A suppressor, which typically goes between your electronic equipment and a receptacle, detects a voltage increase and prevents it from continuing into the equipment.
Safety, Tools, and Contractors What should you consider protecting? Anything with a microchip such as …
➤ Computers.
➤ Televisions, VCRs, and stereos.
➤ Telephones and answering machines.
➤ Microwave ovens.
Why telephones? Phone lines and cable lines run in close proximity to power lines. An electrical surge could travel down the phone or TV line instead of the power line. Not only your phones but also your computer could be damaged if it has a modem and is connected to your phone line.

Surge-Suppression Devices

Electricity is like human relationships: It has its peaks, its low points, and a lot of time in between when it just muddles through without causing much excitement. Left to its own devices, it probably would muddle through day in and day out, but we (and a lightning storm or two) interfere and cause surges and spikes. What are they? Simply put, they are increases, usually sudden, in electrical voltage. Surges differ from spikes in part by how they occur.
Surges can result from …
  • The energy demand when a large appliance is first turned on.
  • Routine maintenance and switching by your utility company.
  • The rush of current to your house after power that was cut off is turned on again. Spikes, on the other hand, most often are caused by lightning or by cars running into power poles. Spikes can send as much as 6,000 volts down your line.
A surge is apparent when you turn on a garbage disposer or a laundry-room appliance. The appliance requires a surge of power to get rolling. This is the same principle behind moving a stationary body: The initial force or power required is greater than the amount needed to sustain movement. The first few pushes you give your kids on a swing require more energy than later ones after momentum has been established.

Multiple-Outlet Devices


If you’ve got a computer and its peripherals (a printer, scanner, and ZIP drive), you probably have a power strip of some kind unless you specifically wire a room of your house as you would an office and give yourself plenty of receptacles. Power strips usually are rectangular-shaped with four or more individual outlets and a built-in circuit breaker. Most power strips in hardware and discount stores are an all-purpose type and are not appropriate for computer use. Leviton, for example, makes computer-grade strips that, according to the catalog, feature “EMI/RFI noise attenuation for microprocessor-driven electronic equipment.” They also provide surge suppression.
You can add receptacles by using outlet box lampholders. These typically are porcelain light fixtures with pull chains to control the lights (instead of a switch). Some of these lampholders, often found in unfinished spaces in a house, come with built-in outlets. These really are meant as a temporary power source, not for running multiple power tools. Remember, as a lighting circuit, it’s most likely running on only 15 amps. Note that in a crawl space, the receptacle on a porcelain lampholder must be GFCI-protected.

Homemade Cords

Once in a while, I run across a home in which a contractor used extension cords made from nonmetalic cable with a plug spliced on to one end and a pair of receptacles in a box on the other. You would never see this on a large commercial job because it would be considered a safety hazard. The more creative guys attach the receptacles to a wood stand with a plywood base so a work light can be mounted. I don’t see any clear advantage to messing around with made-on-the-job cords like this when an approved 100-foot, 12/2 extension cord can be purchased for a modest amount of money and will last for years.

Monday, September 8, 2008

Understanding extension cords rules

Extension cords come with warnings and usage guidelines just like every other consumer product. Some of the best advice comes from fire departments and the Consumer Product Safety Council, both of which have experience with the injuries and destruction caused by misuse of extension cords and power strips. Here’s a list of extension cord do’s and don’ts:
  • Use extension cords for temporary use only.
  • Unplug extension cords when they’re not in use.
  • Only use cords having gauges that are properly matched to the load and the current to be drawn.
  • Only use cords outside that are specifically marked for this type of use.
  • Only use polarized receptacles with polarized cords.
  • Never remove the grounding prong from the plug of an extension cord to fit it into an ungrounded receptacle.
  • Regularly inspect your cords for damage.
  • Never splice a damaged extension cord or one cord to another.
  • Do not run cords across or through wet areas or puddles.
  • Hang cords high off the floor to avoid tripping hazards on work sites. Don’t allow cords to hang from counter- or tabletops where children can pull on them.
  • Cover any unused sections of the cord’s outlet end with safety caps to keep children from inserting objects.
  • Replace damaged or worn cords.
  • Always stretch out the cord, and never cover it with rugs, carpets, clothing, or heavy objects. Cords can build up heat if they are used when coiled or looped.
  • Extension cords are temporary wiring. Don’t attach them to walls or woodwork with staples or nails that can damage the cord and present a fire hazard.
  • Don’t plug extension cords together. Instead, use a single cord long enough to do the job on its own.
  • Buy cords that have been tested by an approved testing lab such as Underwriters Laboratory (UL) or Electrical Testing Laboratories (ETL).

When Extension Cords Go Bad


In the 1960s, the first recalls of defective or assumed-defective automobiles began, and we’ve been recalling consumer products ever since. Surprisingly, there have been a number of extension-cord recalls, although they don’t get quite the same publicity as, say, recalling the family minivan because the wheels have a tendency to fall off. The following is a list of recent recalls, courtesy of the Consumer Product Safety Commission:
  • Approximately 230,000 extension cords manufactured in China and distributed by a Texas firm were recalled due to undersized wires and improper plugs, according to a September 20, 1994, announcement.
  • In a May 29, 1997, press release, the General Cable Corp. announced the recall of 2,700 outdoor extension cords sold under the Carol and Ace brand names due to an exposed wire near the receptacle. No injuries had been reported from the use of these cords.
  • A Miami, Florida, firm recalled almost 6,600 extension cords and power strips in 1998 due to undersized wires that could not carry the advertised load, improperly polarized plugs, and no overcurrent protection in the surge protectors.
  • A February 24, 1999, press release warned consumers about two million faulty extension cords, power strips, and surge protectors involved in 25 recalls since 1994. An ongoing investigation started in 1997 found that most of the faulty cords were made in China, were sold at discount stores, and in some cases, had counterfeit UL certification labels.
This doesn’t exactly inspire confidence, but it’s useful because it provides the motivation to inspect and check your extension cords on a regular basis. On large construction sites, monthly testing of extension cords for grounding is mandatory, as is recording the test results. Cords that pass inspection are marked with a piece of colored tape. (The color changes monthly.)

One Extension Cords Size Doesn’t Fit All


Extension cords are measured by their wire gauge size just like the wires running inside your walls. Their ampacity rating uses the same American Wire Gauge (AWG) standards: the smaller the number, the thicker the wire (which means it can carry a larger current because it offers less resistance). This is especially important with longer cords because a current loses some voltage as it travels over a conductor, and this can affect the performance of a device (such as a power tool) on the other end. When the voltage drops, any electrical equipment on the cord will pull more current to compensate for the lost voltage. This generates more heat, which causes damage to the tool. The longer the conductor, the greater the voltage drop. Contractors usually use a 12/2 extension cord to run their tools, and you should, too.
Typically, extension cords are available in 10, 12, 14, 16, and 18 gauges. An 18-gauge cord is the size normally used for very small loads such as lamps or clock radios.
The following table shows typical extension-cord lengths and gauge combinations.


What the NEC says about extension cords?


Extension cords aren’t permanent wiring, so the National Electrical Code doesn’t apply to them per se, but it does lay out some guidelines. The NEC would prefer that you use a close-by receptacle, but that’s a little unrealistic if you’re running an electric lawnmower, for example. The code recognizes that extension cords are meant only for temporary use for portable loads that aren’t fixed to one specific location.
What about a table lamp and clock radio by your bedside connected to a small-gauge extension cord because the only receptacle on the wall is beyond the length of their appliance cords? The NEC would like you to install a new receptacle, but sometimes this isn’t practical. If you’re renting, you would have to convince your landlord/landlady to accept this additional expense. For such a small load, the use of an extension cord on a regular basis isn’t a big deal. Problems occur, however, when extension cords are used to run large loads on a more or less permanent basis. Small extension cords become a bigger problem when they are installed under a rug or are in any way covered over so they retain heat.

Understanding Extension cords

Think of an extension cord as a portable, impermanent form of wiring. It’s subject to the same laws and limitations as any other electrical conductor, which means it can be overloaded, it can short out, and its insulation can melt. On top of that, they’re easy to trip over when they’re left lying around a work site. Extension cords are handy and necessary, but they need to be used carefully and inspected before each job. According to the Consumer Product Safety Commission
  • More than 3,000 residential fires each year are attributed to extension cords. Most of the problems are the result of short circuits, excessive loads, and misuse of the cords.
  • Hospital emergency rooms treat more than 2,000 injuries each year associated with extension cords. These injuries include fractures, lacerations, and sprains from tripping over the cords. About half of the injuries to children are caused by electrical burns to the mouth.
  • Tens of millions of dollars in fire damage occur yearly as the result of misuse of extension cords.
You might never look at an extension cord in the same way again!

Home-Improvement Stores vs. Electrical Wholesalers


Electricians usually do their shopping with suppliers whose stock and trade are electrical components. Large commercial companies always shop at these establishments. They don’t share their space with paint, kitchen cabinets, or coupon specials. They also don’t operate quite the same as a retail establishment. This means …
  • Don’t expect them to explain how to do your wiring or use the tools.
  • Very little will be on display, so you’ll need to have a clear idea of what you want when you go in.
  • If a store is wholesale only, it might sell only to contractors. The advantage of shopping at a wholesale supplier used to be the range of supplies and devices available, but in recent years, the large homeowner-oriented building-supply stores such as Home Base and Home Depot have narrowed this gap in the residential categories.
A trip to our local Home Base found Square D, Cutler-Hammer, and Westinghouse service panels available as well as a huge variety of boxes, conduit, cable, connectors—you name it. These stores are geared toward do-it-yourselfers who need to see the components and fixtures instead of trying to order them blind at a wholesaler. They also order merchandise by the trainload and usually have competitive prices.

Monday, August 25, 2008

UL-Approved Parts for You


It would be unusual to run across an electrical component that isn’t UL (Underwriters Laboratories) approved, but always check for this tag or stamp of approval on anything you buy, whether it’s a flashlight, power tool, or electrical device. A UL listing is your assurance that the product has been tested for safety. Receptacles, light switches, light fixtures, and appliances all should have UL approval. Keep in mind that UL approval doesn’t imply longevity or ease of installation. A cheaper, lower-end product will never be the equivalent of a more expensive product.

Rent or Buy the ElectricianTools?


Tools might come with some of the same specifications, but one ½-inch drill isn’t necessarily the same as the next. One of the main differences is the size of the motor. Professional, heavy-duty models have large motors and can reduce your drilling time through wood and masonry. Hand tools have their differences as well, usually in the quality of the metal components and the sharpness of the cutting edges. Price is a good determinant here, and you really do get what you pay for. That’s why those 99¢ screwdrivers lose their square edge quickly.

If your framework is exposed and you’re ready to do a lot of drilling at once, you might be better off renting a drill with a large motor. An electrician will use a heavyduty drill regularly and can justify the expense of owning one. The larger the motor, the weightier the drill, so these tools aren’t appropriate for all drilling jobs unless you’re on steroids. As a cost comparison, a Makita 7.5 amp, ½-inch angle drill (a large right-angle drill) runs about $290. Local rental prices vary, but I’d be surprised if it cost more than $20 or so a day to rent one of these. A right-angle drill is convenient for drilling in tight spaces.

Before you rent a tool, handle it and get a feel for it. A heavy tool can be uncomfortable to hold for an extended period of time. You might be better off with a smaller drill that you can handle more safely. When I had nothing else available, I drilled through old, hardened floor joist with a 3/8-inch drill without the sharpest of drill bits, and I still got the job done (not that I recommend this approach—it took time).

Understanding Drill Bits


Drill bits come in every shape and size for all types of jobs, from drilling through masonry to fine craftwork. The most common bits most of us have seen are twist bits that are sold both individually and in sets based on gradation. Twist bits are fine for small holes, but they’re not much use in electrical work except for running small, low-voltage wires.
Electricians run more than one cable through a hole whenever possible, and larger holes (one inch in diameter) are drilled with another type of drill bit. The following are the most common bits for drilling larger holes:
➤ A spade bit
➤ An auger bit
➤ A power bore bit
When running a single cable through a wall stud or joist, a 5/8-inch hole usually is drilled.

Care and Feeding of Power Tools


Power tools are great timesavers and are more fun to use than hand tools. These tools won’t be fun for long, however, if they’re misused and abused. Be sure to avoid the following:
  • Lifting the tool by pulling on the power cord instead of the handle or body of the tool
  • Dropping the tool, especially from the second floor to the first
  • Applying too much pressure while using the tool and ignoring warning signs such as the blade or drill bit slowing down and straining or the motor giving off a burning smell
  • Ignoring damaged cords
  • Leaving the tool out in the rain
Tools don’t ask for much. They’re like huskies and dogsleds. If you treat huskies well and keep them fed, they’ll pull your sled until they drop. A power tool will keep going and going if you take care of it. I’ve run across homeowners with 40-year-old electric drills that still run like the day they came out of the box.
Taking care of your tools also will protect you. A frayed cord can lead to an electrical short, which is not good for your health. A dull blade or drill bit can cause the tool to slip and cut you instead of the wood you’re aiming at.


Power Tools for Amateur


During the dawn of electrification at the end of the nineteenth century, electric tools had yet to be invented. Knob-and-tube wiring passed through wall plates (the horizontal 24s at the bottom of a wall) but ran along the surface of the wall studs, so electricians had little drilling to do. These days, it all passes through studs, plates, and joist, and no one in their right mind would hand-drill the necessary holes. The electric drill is probably the most ubiquitous power tool around. Drills are manufactured according to chuck size. The chuck holds the drill bit or another attachment such as a grinding wheel or a buffer pad. The larger the chuck, the bigger the drill motor (because more power is required to drive larger drill bits and attachments).

A manufacturer’s usual line of drills includes ¼-inch, 3/8-inch, and ½-inch models. Drills come in both corded and cordless models. A cordless model runs on a rechargeable battery. Cordless tools are really convenient. The drawback, of course, is battery life. The tougher the task, such as drilling through wood joist, the more demand on the battery and the shorter its work life before needing a charge. A high-end model such as a Makita ½-inch, 18-volt cordless will hold up longer under more demanding drilling, but it isn’t cheap (around $245). For repetitive, serious drilling, a corded model often is the best choice.
A cordless drill usually costs more than a corded model of equal size. Sales and closeouts can narrow the gap. Power is the key here, so stick to at least a 12-volt model. Also compare charging times for the batteries (the shorter the better).

A decent ½-inch drill will get you through most electrical drilling chores and just about any other job around the house. It will last for years and years doing occasional residential work without breaking your remodeling budget. Prices for an acceptable
½-inch electric drill start at around $70 and up. You’ll find a few other power tools and accessories to be useful as well including …
  • A reciprocating saw for sawing large holes in walls and ceilings.
  • A circular saw for framing work.
  • 12/2 extension cords.
Extension cords are manufactured according to wire gauge, just like electrical cable. A 12/2 cord is made from 12-gauge wire and contains hot, neutral, and grounding conductors.

Sunday, August 10, 2008

Hand Tools List for Electrician

You’ll already be familiar with some of these tools; others are limited to the electrical trade. These tools will cut, strip, and twist wires and will secure electrical boxes, light fixtures, switches, and receptacles. You could strip away insulation with a pocketknife and cut wire by bending it back and forth until it breaks, but you’ll end up with sloppy results and damaged cable. Good cutting and stripping tools prevent wires and insulation from getting nicked and enable you to work with wire in tight areas such as small boxes. The following tables list the basic hand tools for electrical work and some more specialized tools, too.
• Claw hammer for Securing boxes to studs and joist
• Long-nose pliers for Bending wires
• Lineman’s pliers for Pulling wires and cutting
• Diagonal pliers for Cutting in tight spaces
• Slotted screwdriver for Securing switches and receptacles
• Phillips screwdriver for Securing switches and receptacles
• 25-inch measuring tape for Setting box heights and so on
• Keyhole saw for Cutting through walls and ceilings
• Hacksaw for Cutting flexible, armored cable
• Wire stripper for Stripping wire insulation
• Cable stripper for Stripping cable insulation
• Flashlight for Working in dark spaces
• Ladders for Accessing overhead work
• Voltage tester for Testing for current
• Receptacle analyzer for Testing for electrical faults
• Continuity tester for Testing for interruptions in the path of a current
• Fish tape for Pulling wires through enclosed areas
• Conduit bender for Bending metal conduit around corners
• Level for Ensuring that equipment is installed straight and true
• Masonry chisels for Working on exterior installations
• Adjustable wrench for Tightening rigid conduit connectors

Tools of the Trade of Electrician


Neanderthals first used stone tools around 70,000 B.C.E., and life has never been the same since. What started out with a guy named Og making a few simple carving and cutting implements has grown into a multibillion-dollar manufacturing behemoth. From fine Japanese woodworking saws to portable cement mixers, there isn’t a single tool we cannot buy or rent. If you walk into any Home Depot or other large home-improvement chain store, you’ll find an absolute cornucopia of both hand and power tools. Every remodeler needs some of both. The notion that the builders of yesteryear felt greater personal accomplishment because they did everything by hand is an absolute myth. Workers in the trades grabbed just about every labor-saving power tool they could as they were invented.

You don’t need the very best tools. Some professionals even shy away from top-of-the-line products because they have more opportunities to damage them on a job site or to lose them, sometimes through theft, as they move around to different locations. On some very large jobs, contractor bids might include the price of new tools. Ironically, a homeowner, who will use tools far less often than a professional, probably would get more use out of expensive, top-quality tools.
Electrical work calls for some specialized tools as well as some multiple-purpose power tools.

Insurance Issues in Electricity Matters


If safety and legality aren’t compelling enough reasons for you to follow your local electrical code and have your work inspected, a chat with your insurance agent might be more convincing. Any damage to your house as the result of faulty, uninspected electrical work (no matter whether it’s done by you or an electrician) probably will not be covered by your insurance company (read your policy carefully). This can range from something relatively simple such as cleaning up after smoke damage to losing your entire home in a fire.
Let this sink in for a moment. You could lose a $200,000 house if a kitchen circuit isn’t installed properly, becomes overloaded, and starts a fire in your walls—all due to the lack of a permit and inspection. Why take the chance? Some electricians might tell you not to bother with a permit for some jobs, but you have to wonder why a contractor would put his business reputation or even license on the line like that. Gambling is more fun in Las Vegas. At least you can get a cheap steak dinner and 24-hour lounge acts out of it.

Keeping the Inspector in Mind


An electrician has some built-in advantages when dealing with an electrical inspector. He or she can speak knowledgeably about code issues and can justify the manner in which the work is being carried out if there are any questions or objections. It’s assumed that an electrician will be basically competent. As a do-it-yourselfer, your work should be neater, cleaner, and on the conservative side. You don’t want to be pushing the electrical-code creativity envelope.

When You Need an Electrician Permit?


I’m not going to pretend that a permit is taken out for every electrical job, even if the local building regulations call for it. It’s tough to justify the time and expense to obtain a permit when you’re only adding a single receptacle to a circuit that can easily support the addition. Nevertheless, I would be remiss as an author if I ever advocated anything less than playing by the rules, especially given the possibility of harm and damage from wayward electrical work. As a case in point, our own electrician recently was telling me about some receptacles added in a residence—by another electrician—without a permit, and none of them were grounded correctly.
You need a permit any time you alter the existing system. This includes …
  • Adding additional receptacles or fixtures.
  • Adding new circuits.
  • Installing a new service or a subpanel.
You usually do not need permits for repairs or updates that do not extend the existing system. This includes …
  • Replacing existing lights with new fixtures.
  • Replacing broken switches or receptacles.
  • Replacing defective circuit breakers.
Always consult your local code to confirm whether you need to take out a permit before you do your work.

Minimum Damage, Minimum Repairs


Hole saws and other tools of the trade do more than make pretty holes for your electrical work. They also keep damage and subsequent repairs to a minimum. This is especially true when you’re cutting through plaster and lath. Lath is the wood or metal backing that acts as a form for wet plaster. The plaster is forced into the lath where it eventually dries into a wall or ceiling. It’s almost impossible to cut a clean hole through lath using hand tools. A hole saw or a reciprocating saw will do the job quickly and cleanly.

Believe me, you’ll never catch an electrician using hand tools when a power tool is the better choice. You might think you have limited use for a hole saw, and you might not want to spend the money on one, but there’s another way to look at it. A four-inch hole saw costs around $20. If you have to install five light fixtures, the hole saw is costing you $4 a light. It’s also greatly reducing your labor time, and you can avoid the frustration of trying to cut a clean circle with hand tools. Besides, you can always find a future use for it, especially if you have more remodeling projects in mind.

Sunday, July 20, 2008

Think Before You Drill


Drilling an unnecessary hole or two through a wall stud or a floor joist isn’t a big deal. Visitors will never see it, and you’re not weakening your house’s framing. This won’t help you get the job done any faster, however, especially if you drill a whole series of holes in the wrong places. Drilling the wrong hole in plaster or drywall is another matter because it requires a repair. In the worst-case scenario, let’s say you cut a four-inch-diameter hole in the ceiling with a hole saw only to discover it was in the wrong location. You would have to …
  • Patch in new drywall or plaster.
  • Coat the patch with finish plaster or drywall compound until it’s smooth. (In the case of a textured surface, the texturing would have to be matched.)
  • Prime and paint the patch.
  • Possibly paint the entire ceiling to match the patched area.
What if you’re not sure where you want to locate a light fixture? Attach some blue painter’s masking tape (this type doesn’t dry out as quickly as regular masking tape) to the proposed location and leave it up for a day or two. Apply the tape in roughly the same shape as the fixture. If it’s a hanging fixture, also attach a string the same length as the chain or light cord. You might decide you don’t want hanging lights, or you might want to relocate them.
When you’re satisfied you’ve found the right location, you can start cutting into the ceiling.

An Electrician’s Mindset


An electrical contractor has the following goals in mind when bidding, planning, and actually doing a job:
  • The job must meet the customer’s requirements.
  • The work must be safe, meet code, pass inspection, and be finished in a timely manner.
  • The final result should be a satisfied customer and a profit for the contractor.

Your goals as a do-it-yourselfer shouldn’t be any different. You want your work to be of satisfactory quality so you can live comfortably with it rather than going crazy every time you look at a crooked light switch or receptacle. It goes without saying that your work must pass inspection, but you also want to get it finished sometime before you reach retirement age. Money-wise, you want to realize a savings from doing your own work. This can be measured in different ways. Some people keep an exact accounting of their hours and assign an hourly rate to the job versus an electrician’s labor bid. Others see it as using their off-hours productively, and anything they save is pure profit. However you measure your savings, you will have faced some challenges and learned from them, and you can’t put a dollar value on that.
By now, you’ll have drawn up a plan, calculated the loads, and gotten your permits. A plan on paper will show you where to locate a receptacle or a light fixture, but it won’t show you how to do so. For example, will you …

  • Run your cable through the attic and drop it down between the wall studs?
  • Consider using the basement or a crawl space for access?
  • Use wire molding and run it along the surface of your baseboards?
  • Remove some of the wood trim and cut into the walls behind it to avoid patching more noticeable sections of the walls? A half-hour of forethought and planning can save you hours of patching. If there’s more than one solution to the job, look at them all and decide on the best approach.

Becoming Amateur Electrician

Wiring is a nice, logical process. You want to get power from point A to point B in the most efficient way possible. Running wire or “roping” a house is mostly a matter of drilling access holes through the house’s framing (the wall studs, plates, and floor joist) and pulling electrical cable through those holes. How you carry out this nice, logical process is another matter altogether.

Like just any task in life, you can do your own electrical work the hard way or the easy way. The hard way means tearing open more walls than necessary, undoing and then redoing part of the job due to poor planning, and trying to drill holes, cut wire, and strip insulation with cheap tools. The easy way calls for planning and economizing your moves and using good tools to give you a better job and to move you through it faster. You won’t be as fast as an experienced electrician, but you’ll have the satisfaction of doing your own work and doing it well. If you’re going to be your own electrician, you need to take your role as seriously as a professional would. This means presenting any required plans to your building department when you take out a permit, knowing the code issues, using the right tools, and finding suitable suppliers for your materials and fixtures. You don’t need to invest in the same level of equipment as an electrical contractor does. After all, you’re not going to be making your living at this. You can, however, become a talented amateur whose work can be respected, even by a professional!